
Introduction
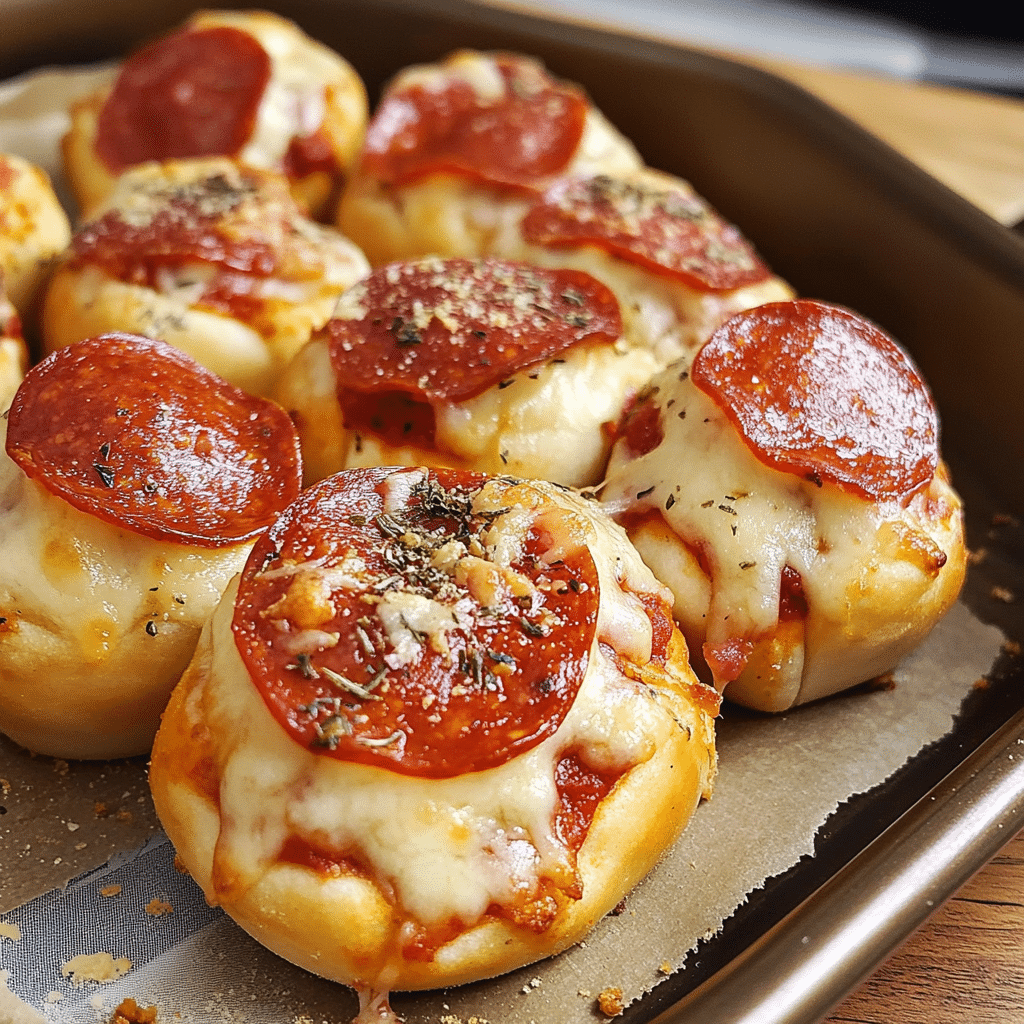
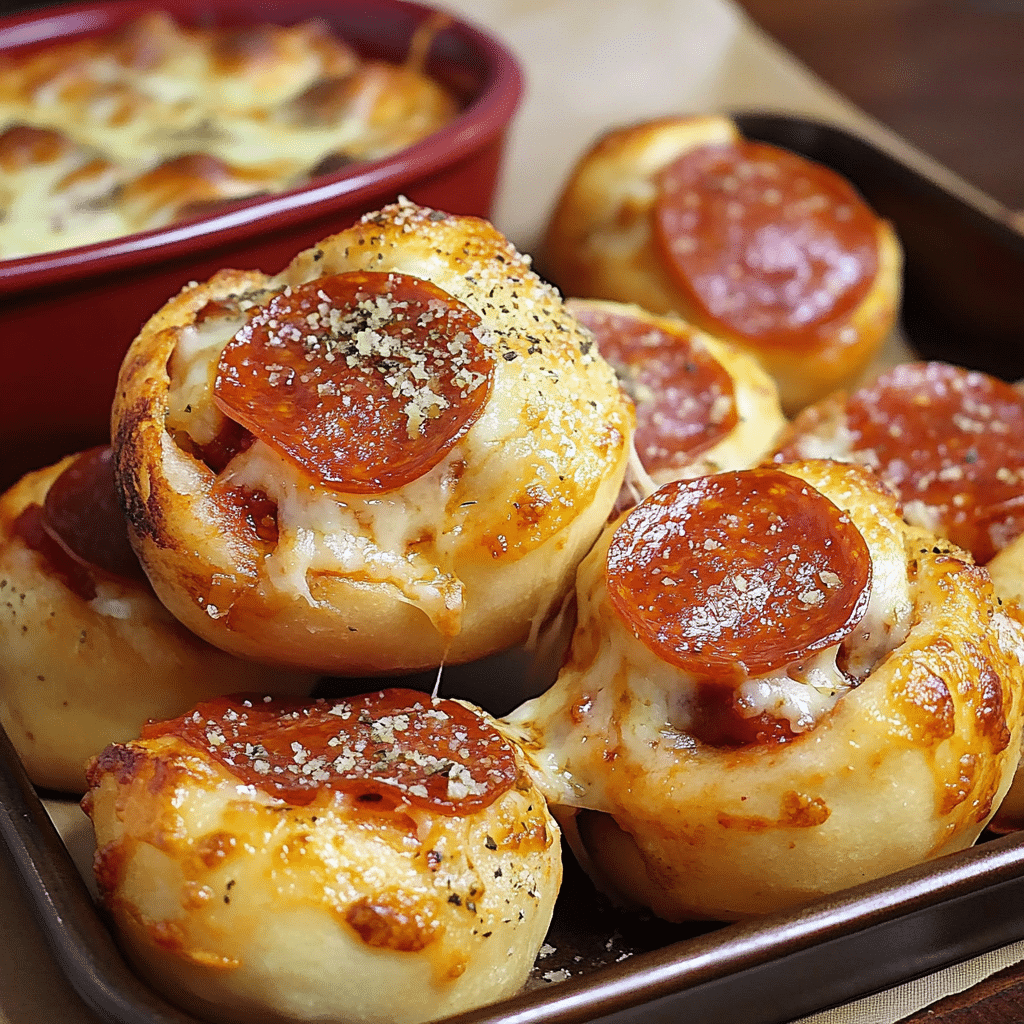
Pepperoni Pizza Bombs are a quick and delicious snack or appetizer, perfect for satisfying pizza cravings without the need for a full pie. These bite-sized bombs are made with soft dough stuffed with gooey melted cheese, spicy pepperoni, and tangy pizza sauce, all wrapped up and baked to golden perfection.
I first made these when I was looking for an easy way to enjoy pizza flavors without the fuss of a full pizza. The reaction from my family was immediate excitement! The crispy exterior gives way to a cheesy, savory filling that’s packed with flavor. You can even dip them in extra pizza sauce or ranch dressing for added deliciousness.
These little bombs are perfect for parties, game nights, or even a fun family dinner. The combination of textures and flavors is a crowd-pleaser for kids and adults alike. Whether you’re feeding a group or just treating yourself, these pizza bombs are guaranteed to be a hit!
Perfect for:
- Game day snacks
- Party appetizers
- Quick family dinners
- Lunchbox treats
- On-the-go bites
Why You’ll Love This Pepperoni Pizza Bombs
Here’s why Pepperoni Pizza Bombs will become your go-to snack:
- Cheesy and Gooey: The melted mozzarella cheese inside makes each bite irresistibly gooey.
- Quick and Easy: Made with simple, store-bought ingredients, these come together in no time.
- Customizable: You can easily swap out fillings to suit your preferences or dietary needs.
- Perfect for Sharing: Their small, bite-sized nature makes them great for gatherings or snacks on the go.
- Crowd-Pleaser: The classic pizza flavors of pepperoni, cheese, and marinara are a hit with almost everyone.
Preparation and Cooking Time
- Total Time: 30 minutes
- Preparation Time: 10 minutes
- Cooking Time: 15-20 minutes
- Servings: 12 pizza bombs
- Calories per serving: Approximately 150-180 calories
- Key Nutrients: Protein: 6g, Carbs: 16g, Fat: 8g
Ingredients
Gather these ingredients to make your Pepperoni Pizza Bombs:
- 1 can (16.3 oz) refrigerated biscuit dough (8 biscuits)
- ½ cup marinara or pizza sauce
- 1 cup shredded mozzarella cheese
- 24 pepperoni slices (about 2 per bomb)
- 2 tablespoons unsalted butter, melted
- 1 teaspoon garlic powder
- 1 teaspoon Italian seasoning
- 2 tablespoons grated Parmesan cheese
- Optional: Red pepper flakes for garnish
Ingredient Highlights
- Biscuit Dough: Store-bought biscuit dough makes this recipe quick and hassle-free. You can also use pizza dough for a more traditional taste.
- Pepperoni: Classic pepperoni slices provide a spicy, savory kick that pairs perfectly with the cheese and sauce.
- Mozzarella Cheese: Shredded mozzarella ensures the perfect gooey, stretchy cheese pull in every bite.
- Garlic Butter Topping: The butter, garlic powder, and Italian seasoning brushed on top add flavor and a golden finish.
Step-by-Step Instructions
Here’s how to make Pepperoni Pizza Bombs:
Prepare the Pizza Bombs:
- Preheat the Oven: Preheat your oven to 375°F (190°C). Line a baking sheet with parchment paper or grease it lightly with non-stick spray.
- Flatten the Dough: Separate the biscuit dough into 8 individual pieces. Cut each biscuit in half, creating 16 smaller pieces. Flatten each piece slightly with your hands or a rolling pin.
- Add the Filling: Place 1 teaspoon of marinara sauce in the center of each dough piece. Top with 1-2 slices of pepperoni and a pinch of shredded mozzarella cheese.
- Seal the Bombs: Carefully pull the edges of the dough up around the filling, pinching them together to seal completely. Roll the dough into a smooth ball, ensuring there are no gaps.
- Arrange on Baking Sheet: Place the sealed dough balls seam-side down on the prepared baking sheet, spacing them about 2 inches apart.
Bake the Pizza Bombs:
- Brush with Garlic Butter: In a small bowl, mix the melted butter with garlic powder and Italian seasoning. Brush this mixture generously over the tops of the dough balls.
- Sprinkle Parmesan Cheese: Sprinkle grated Parmesan cheese over the tops for extra flavor and a slightly crispy finish.
- Bake: Bake in the preheated oven for 15-20 minutes, or until the dough is golden brown and cooked through.
- Cool Slightly: Let the pizza bombs cool on the baking sheet for 5 minutes before serving.
How to Serve Pepperoni Pizza Bombs
Pepperoni Pizza Bombs are versatile and can be served in many ways:
- With Dipping Sauces: Serve with extra marinara, ranch dressing, or garlic butter for dipping.
- As a Party Appetizer: Arrange them on a platter with toothpicks for easy snacking.
- For Lunch or Dinner: Pair with a side salad or a bowl of soup for a complete meal.
- On the Go: Pack them in a lunchbox or take them along for a road trip snack.
Additional Tips for Pepperoni Pizza Bombs
Here are some tips to ensure your Pepperoni Pizza Bombs turn out perfect every time:
- Don’t Overfill: Avoid overloading the dough with filling to prevent it from bursting during baking.
- Seal Completely: Pinch the dough tightly to avoid leaks while baking.
- Customize the Fillings: Swap out the pepperoni for other toppings like cooked sausage, mushrooms, or bell peppers.
- Reheat Properly: Reheat leftovers in the oven or air fryer for a crispy exterior.
- Use Pizza Dough: If you prefer a more traditional texture, substitute biscuit dough with store-bought or homemade pizza dough.
- Double the Recipe: These disappear quickly, so consider doubling the recipe for larger gatherings.
- Ensure a Tight Seal: When wrapping the dough around the fillings, make sure the seams are tightly sealed to prevent the cheese and sauce from leaking out.
- Use a Pizza Stone: If you have one, bake the bombs on a pizza stone for an even crispier bottom. It helps distribute heat more evenly.
- Add Seasoning: Sprinkle some Italian seasoning, red pepper flakes, or oregano on top of the pizza bombs before baking for added flavor.
Recipe Variations for Pepperoni Pizza Bombs
Here are 10 variations you can try for Pepperoni Pizza Bombs:
- Cheese Pizza Bombs: Skip the pepperoni and double up on the mozzarella for a classic cheese bomb.
- Veggie Pizza Bombs: Fill with chopped bell peppers, mushrooms, and olives for a vegetarian option.
- Sausage Pizza Bombs: Use cooked crumbled sausage instead of pepperoni.
- BBQ Chicken Pizza Bombs: Replace marinara with BBQ sauce and fill with shredded cooked chicken.
- Hawaiian Pizza Bombs: Add diced ham and pineapple chunks for a sweet and savory twist.
- Spinach and Ricotta Pizza Bombs: Use a spinach and ricotta mixture for a creamy, vegetarian filling.
- Buffalo Chicken Pizza Bombs: Swap marinara for buffalo sauce and fill with shredded chicken and mozzarella.
- Meat Lover’s Pizza Bombs: Add a mix of pepperoni, sausage, and bacon for a hearty bite.
- Breakfast Pizza Bombs: Fill with scrambled eggs, cooked bacon, and cheese for a breakfast twist.
- Taco Pizza Bombs: Use seasoned ground beef, salsa, and cheddar cheese for a taco-inspired snack.
Freezing and Storage for Pepperoni Pizza Bombs
- Freezing: You can freeze unbaked pizza bombs for up to 2 months. Place them on a baking sheet, freeze until firm, then transfer to a zip-top bag. Bake directly from frozen, adding a few extra minutes to the baking time.
- Storage: Store leftover pizza bombs in an airtight container in the refrigerator for up to 3 days. Reheat in the oven or air fryer for the best results.
Special Equipment for Pepperoni Pizza Bombs
Here are some special equipment items to make preparing your Pepperoni Pizza Bombs easier:
- Baking Sheet: A large baking sheet ensures even cooking and prevents overcrowding.
- Pastry Brush: Use a pastry brush to evenly coat the dough balls with the garlic butter mixture.
- Rolling Pin: Flatten the biscuit dough easily with a rolling pin.
- Measuring Spoons: Ensure accurate portions of marinara sauce and seasonings.
- Parchment Paper: Line the baking sheet with parchment paper for easy cleanup.
Frequently Asked Questions for Pepperoni Pizza Bombs
- Can I make these ahead of time?
Yes, you can assemble the pizza bombs ahead of time and refrigerate them for up to 24 hours before baking. - Can I use crescent roll dough instead of biscuits?
Absolutely! Crescent roll dough works well for a flakier texture. - Can I air fry these instead of baking?
Yes, cook them in an air fryer at 375°F for 8-10 minutes or until golden brown. - What other cheeses can I use?
You can use cheddar, provolone, or a mix of Italian cheeses for variety. - How do I prevent leaks during baking?
Make sure to seal the dough tightly around the filling and avoid overstuffing.
Pepperoni Pizza Bombs

Pepperoni Pizza Bombs are a quick and delicious snack or appetizer, perfect for satisfying pizza cravings without the need for a full pie. These bite-sized bombs are made with soft dough stuffed with gooey melted cheese, spicy pepperoni, and tangy pizza sauce, all wrapped up and baked to golden perfection. They’re ideal for parties, game nights, or even a fun family dinner. With their crispy exterior and cheesy, flavorful filling, these pizza bombs are sure to become a favorite for both kids and adults.
- Prep Time: 10 minutes
- Cook Time: 15-20 minutes
- Total Time: 30 minutes
- Yield: 12 servings 1x
Ingredients
- 1 can (16.3 oz) refrigerated biscuit dough (8 biscuits)
- ½ cup marinara or pizza sauce
- 1 cup shredded mozzarella cheese
- 24 pepperoni slices (about 2 per bomb)
- 2 tablespoons unsalted butter, melted
- 1 teaspoon garlic powder
- 1 teaspoon Italian seasoning
- 2 tablespoons grated Parmesan cheese
- Optional: Red pepper flakes for garnish
Ingredient Highlights
- Biscuit Dough: Store-bought biscuit dough makes this recipe quick and hassle-free. You can also use pizza dough for a more traditional taste.
- Pepperoni: Classic pepperoni slices provide a spicy, savory kick that pairs perfectly with the cheese and sauce.
- Mozzarella Cheese: Shredded mozzarella ensures the perfect gooey, stretchy cheese pull in every bite.
- Garlic Butter Topping: The butter, garlic powder, and Italian seasoning brushed on top add flavor and a golden finish.
Instructions
Prepare the Pizza Bombs:
- Preheat the Oven: Preheat your oven to 375°F (190°C). Line a baking sheet with parchment paper or grease it lightly with non-stick spray.
- Flatten the Dough: Separate the biscuit dough into 8 individual pieces. Cut each biscuit in half, creating 16 smaller pieces. Flatten each piece slightly with your hands or a rolling pin.
- Add the Filling: Place 1 teaspoon of marinara sauce in the center of each dough piece. Top with 1-2 slices of pepperoni and a pinch of shredded mozzarella cheese.
- Seal the Bombs: Carefully pull the edges of the dough up around the filling, pinching them together to seal completely. Roll the dough into a smooth ball, ensuring there are no gaps.
- Arrange on Baking Sheet: Place the sealed dough balls seam-side down on the prepared baking sheet, spacing them about 2 inches apart.
Bake the Pizza Bombs:
- Brush with Garlic Butter: In a small bowl, mix the melted butter with garlic powder and Italian seasoning. Brush this mixture generously over the tops of the dough balls.
- Sprinkle Parmesan Cheese: Sprinkle grated Parmesan cheese over the tops for extra flavor and a slightly crispy finish.
- Bake: Bake in the preheated oven for 15-20 minutes, or until the dough is golden brown and cooked through.
- Cool Slightly: Let the pizza bombs cool on the baking sheet for 5 minutes before serving.
Nutrition
- Calories: 150-180 kcal
- Fat: 8g
- Carbohydrates: 16g
- Protein: 6g
Conclusion
Pepperoni Pizza Bombs are the ultimate quick and easy snack that combines everything you love about pizza into a portable, bite-sized treat. With their cheesy, gooey centers and crispy, golden exteriors, they’re a guaranteed hit for any occasion. Whether you’re hosting a party, watching the big game, or simply craving something delicious, these pizza bombs are sure to please everyone at the table.
This recipe is as fun to make as it is to eat, making it perfect for casual get-togethers or a cozy night in. Whether you’re sharing them with friends or keeping them all to yourself, these pizza bombs are a crowd-pleasing snack everyone will rave about.
I’d love to see how your Pepperoni Pizza Bombs turn out! Snap a photo, share it on social media, and don’t forget to tag me—I can’t wait to see your delicious creations. Happy cooking!